Tutorials
Image Resolution, Print Size, and Print Quality
Why Does Image Resolution Matter?
Have you ever saved an internet image and tried to print it on your home computer? The image looks huge on your computer screen, but it looks tiny on paper! Why?! The answer is: Image resolution and size. This article will briefly explain the basics about image resolution, how it affects print size, and what you can do to ensure the best possible quality of your print images.
Please keep in mind: Image resolution is a vast topic, and this article is not intended to be a thorough examination. I aim only to help you understand enough to make basic decisions about your design and print processes. For an in-depth study, additional research will be required.
What is Image Resolution?
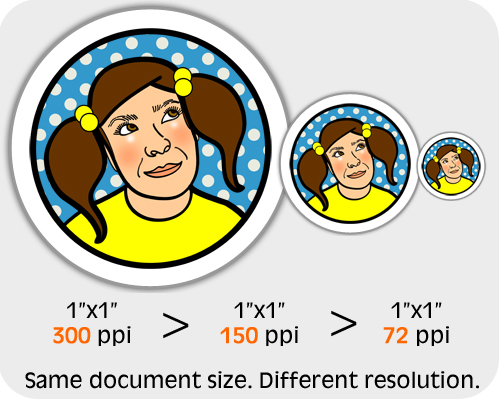
First, let’s talk about digital images. Digital images are all graphics you find on the web, photos from your camera, and even some logos for your business. Most digital images are made up of pixels. A pixel is a tiny dot that contains information about that image. Any given image may be made up of hundreds, even thousands, of these tiny pixels that together form a picture. Simply put, image resolution refers to the number of pixels per inch of the image. The unit of measurement used to describe image resolution is: pixels per inch (ppi). You may also see this same term expressed as dots per inch (dpi). The ppi refers to how dense the pixels are per inch of an image. The more pixels per inch an image has, the more detail it has, and the better quality the image will be.
And Then There’s Math: Raster vs. Vector
When an image is made of pixels, as we’ve discussed, it is considered a raster image. Raster files include (but are not limited to) all .jpg, .bmp, .png, .gif, .tiff, .cpt, and .psd files. However, there is a type of image that is not made of pixels. Vector graphics are created using a mathematical equation, instead of pixels. Vector images can be scaled up or down without losing their quality (unlike raster images, which we will discuss later). Software programs such as Adobe Illustrator and Corel Draw are used to design vector graphics.
Color and Image Resolution: RGB to CMYK
Even though computers and printers work together, individually they are two very different mediums. For instance, they interpret and output color in two entirely different ways. After all, computers represent color digitally using light, while printers use ink. Your computer uses a color system called RGB, meaning it creates color with various combinations on a Red, Green, Blue spectrum. Your home printer, on the other hand, uses a color system called CMYK, meaning it creates color with various combinations of Cyan, Magenta, Yellow, and Black. When converting an RGB computer image to a CMYK printer, some pixel information is lost (approximately half). This is another possible reason why a raster image can appear 6 inches tall on your computer screen and only 3 inches tall in print.
Resizing Images
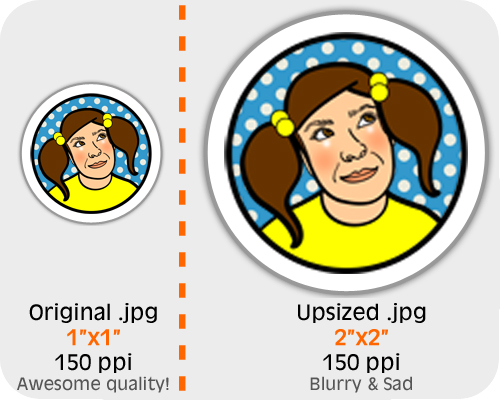
A raster image is created with a certain number of pixels. When you resize an image and make it smaller, you are throwing some pixels away. After you click File > Save, the image can never gain those pixels back again. Here’s a good analogy: Imagine your favorite pair of jeans. You can wash them, then throw them into the dryer and shrink them, but you can never make them bigger again. The same is true for a raster image. You can always downsize a raster image, but you can never upsize (upsample) it again without losing quality. Let’s say you found an internet image that you’d really like to print, but it’s super small. Ideally, you could just open it up in an image editing program like Photoshop, click Image > Resize, and make it as big as you need it to be. Unfortunately, that’s not how it works. When you try to upsize that low resolution image, the remaining pixels become stretched thin to fill the full space of the document size you are requesting. The result is a blurry, sad looking graphic.
.JPG Isn’t Always Best: Lossy Data Compression
On a related note, let’s just take a moment to discuss lossy and lossless files. File types such as .jpg are designed to be small, compact, and easy to store. When you save a file as a .jpg, the data used to create your image is compressed. Similar to when we downsize an image, data is thrown away that cannot be recovered. While .jpg is great for many purposes, when preparing an image for print, it is best to work in a lossless file type, such as .png. The files are larger, but they retain all of the essential data without compressing or throwing anything away.

So, What Image Resolution Do I Need?
Ok! Let’s get down to the dirty details. What you really want to know is: What image resolution do I need? Here’s the short and sweet version:
Not So Great Print Quality: 150 ppi
Great Print Quality: 300 ppi
Best Print Quality: 600 ppi
Anything below 150 ppi will result in a terrible quality print. For most purposes, anything above 600 ppi will make no detectable difference.
And Don’t Forget About Document Size!!!
Now it’s time to place the final puzzle piece: It’s not enough to adjust your image resolution. Remember, image resolution denotes the density of pixels per inch. To get the right size for your image, you must adjust your document size, and that is the easy part. Your document size should be the size you would like your image to print. For instance, if I want to print a great quality graphic that is 5”x5” on a standard piece of printer paper, the image properties should be 5”x5” in 300 ppi.
Up, On, and Away!
I hope this article has helped give you a basic understanding of image resolution and print size. It’s kind of a complex animal, if you’re new to graphic design. Any of these topics can be further researched to unveil a huge amount of additional information. I recommend just focusing on the basics at first, then do more research as issue arise, questions form, or curiosity leads. Just keep designing, printing, and learning!